![]()
![]()
![]()
![]()
![]()
This chapter attempts to explain some tips and tricks for the telnet command. It does not attempt to cover all telnet programs on all platforms; that would be too onerous a task. Instead, it concentrates on NCSA Telnet, which runs on MS-DOS machines
with network connections; QVTNET, which runs under Windows in a networked environment; and UNIX Telnet, with which most Internet users will be familiar. In all of these versions, telnet enables a user to connect to another Internet machine, whether it be
in the next room or halfway around the globe. The phrase Internet machine refers to a system that is running the TCP/IP protocols. These protocols are what make Internet connectivity possible. Telnet is often referred to as remote login,
which simply means connecting one machine to another so that a user may interact with that other machine as though he or she were actually using it locally.
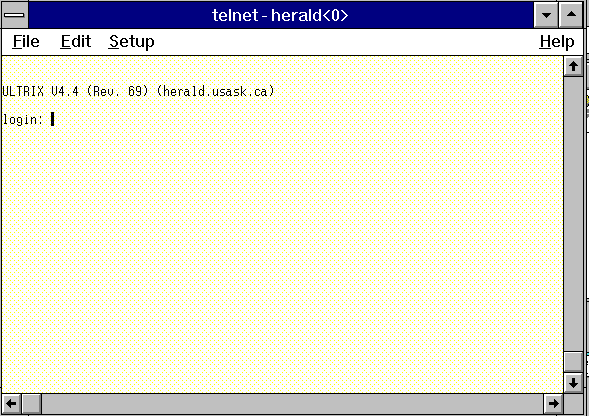
To explain this concept simply, take a look at a typical telnet session using the UNIX version.
A UNIX user performs most functions from a local prompt, which may consist of the % character or a machine name (for example, herald%), or a path (for example, scottp@mary:/home/homec/scottp%. If a user merely types telnet at the prompt, the following
prompt appears:
telnet>
 Note: By keying help or ?, the following list of commands is presented:
Command: |
Description |
|
close |
closes current connection |
|
display |
displays operating parameters |
|
mode |
tries to enter line or character mode (mode ? for more) |
|
open |
connects to a site |
|
quit |
exits telnet |
|
send |
transmits special characters (send ? for more) |
|
set |
sets operating parameters (set ? for more) |
|
unset |
unsets operating parameters (unset ? for more) |
|
status |
prints status information |
|
toggle |
toggles operating parameters (toggle ? for more) |
|
slc |
changes state of special charaters (slc ? for more) |
|
z |
suspends telnet |
|
! |
invokes a subshell |
|
environ |
changes environment variables (environ ? for more) |
|
? |
prints help information |
In most cases it is not neccessary to use or even understand all of the commands. Let us, instead, concentrate on those that are useful and often deployed. By issuing the command:
telnet> open willow.usask.ca
and pressing Enter, the user connects to a machine named willow, which is situated at the University of Saskatchewan in Canada:
telnet> open willow.usask.ca

Trying 128.233.74.5...

Connected to willow.usask.ca.

Escape character is '^]'.

UNIX(r) System V Release 4.0 (willow)

login:
The local system tried to connect to the remote system willow.usask.ca, which also has the Internet number 128.233.74.5. In this case, the user is being told that the keyboard characters Ctrl+] will break the connection, that willow is operating with
UNIX(r) System V Release 4.0, and that it is ready to accept a user login name. If the user has an account on the remote system, then the username is entered:
login: scott
This brings up the password prompt, enabling the user to complete the login:
password: xxxxxxxx
and receive the remote prompt:
willow>
When the user has finished using the remote system, he or she may want to return to the local system. A simple logout or exit command usually suffices.
Sometimes, it is not obvious which command is valid for logging out of a remote machine. A user may key any number of terms to break the connection and still not succeed. The best way to break a connection is with the escape character—in this
example, by holding down the Ctrl key and the right bracket at the same time. This brings up the familiar telnet> prompt, at which point the word quit or close is entered.
If a user is connecting from a machine at, say, usask.ca to another machine at the same site, it is neccessary only to key the remote machine's name at the telnet prompt:
telnet> open machine-name
Often, a user may be using telnet to connect to another machine (host 1) that, in turn, connects to a further machine (host 2). If the user keys the traditional escape key to leave host 2, then the connection to host 1 will also be lost. This may be
quite inconvenient. Instead, the set command can be used to change the escape key on the local machine. At the telnet> prompt, the following may be issued:
telnet> set escape new-character
It is always wise to define the new key in such a way that it will not conflict with any keystroke available on the host or remote system.
At times it is neccessary to temporarily leave a telnet session in order to perform a task on the local machine. Here is an example. Suppose a user has used telnet to connect to an online catalog:
herald% telnet

telnet> open sundog
This puts the user into the remote site. In order to leave, the escape key is entered, bringing up the telnet> prompt. The ! character is entered, and the user receives the local prompt again:
telnet> !

herald%
at which point local machine commands may be entered. When exit is keyed, the local prompt is returned. Hitting Enter again places the user back into the remote site.
When connecting to a remote computer with telnet, a user is automatically connected to port 23. This is the port reserved by UNIX systems for incoming telnet sessions. However, it is possible to telnet to another port to run certain applications. For
example, if a user wanted to run the finger program on a remote system, the following command would be issued:
telnet> open herald 79
Once connected, the user merely hits the Return key to see who is currently logged in to that remote machine:
Login      Name                    TTY Idle    When            Office

ford       Ron J. Ford             02   37     Tue 09:37

jjk136     Justina Jill Koshins    03          Tue 06:41

burke      John Burke              04    2     Tue 12:18

bergg      Gary Berg               05   46     Tue 11:47

anderson   Cathy Anderson          06   41     Tue 10:02

stefaniu   Debbie Stefaniuk        07 3:41     Tue 08:53
A local user can also receive specific information that a remote user has made public through his or her .plan file. For example, John A. Magliacane, of Brookdale Community College in New Jersey, "publishes" the SpaceNews online
newsletter. To read it, the user types the following:
telnet> open pilot.njin.net 79
and when connected, types the username magliaco to receive the following:
Login name: magliaco

In real life: John Magliacane

Directory: /njin/u4/magliaco            Shell: /bin/ocsh

Last login Tue Jun  7 09:33 on ttyu7 from basie.rutgers.ed

New mail received Tue Jun  7 13:12:01 1994;

  unread since Tue Jun  7 10:37:11 1994

Plan:

SB NEWS @ AMSAT $SPC0606

* SpaceNews 06-Jun-94 *

                               =========

                               SpaceNews

                               =========

                           MONDAY JUNE 6, 1994

SpaceNews originates at KD2BD in Wall Township, New Jersey, USA. It is

published every week and is made available for unlimited distribution.

<text edited out>
Of course, regular UNIX users know that the finger program can accomplish the same task; I am merely pointing out the power that telnet has. It should be noted, however, that many non-UNIX users find that using telnet to port 79 is the only way to
access such information, because remote fingering is not always possible.
Here are some other useful information sources available via telnet to port 79. Note that the telnet address is being keyed in without the user being in open command mode:
telnet oddjob.uchicago.edu 79

Enter: copi
This is an Almanac of Events maintained by Craig J Copi.
The following give current earthquake information for various parts of the United States. Enter quake after being connected:
telnet geophys.washington.edu 79   (Washington, Oregon)

telnet fm.gi.alaska.edu 79         (Alaska)

telnet scec2.gps.caltech.edu 79    (Southern California)

telnet slueas.slu.edu 79           (Southern Illinois)

telnet seismo.unr.edu 79           (Nevada and California)

telnet andreas.wr.usgs.gov 79      (Northern California)

telnet eqinfo.seis.utah.edu 79     (Utah, Wyoming, Montana)
Get a copy of the Internet Services List, compiled by Scott Yanoff. This list gives instructions for connecting to many Internet resources via telnet, especially those with nonstandard port numbers. It is available via telnet to csd4.csd.uwm.edu 79
(enter yanoff when connected). The list includes connections to Chat Services, Online Games, Sports Information, and certain Bulletin Board Services.
Most remote computers can be accessed with telnet, but there are still many around that need to be connected via tn3270. tn3270 allows a UNIX machine to connect to an IBM-mainframe machine, using full-screen and full-duplex emulation. Suppose, for
example, a user needed to connect to the Pickler Memorial Library, Northeast Missouri State University, which has the Internet address academic.nemostate.edu. Telnetting to that address would connect the user but would not allow a public login. The user is
instead presented with
_8VM/ESA ONLINE_8
which is not particularly enlightening. With a tn3270 connection the following is shown:
  VM/ESA ONLINE

                  NN      NN    MM               MM        SSSSSSSS      UU     UU

                  NNN    NN    MMM         MMM      SS           SS      UU     UU

                  NNNN  NN    MMMM    MMMM     SS                      UU     UU

                  NN NN NN    MM MM MM MM         SSSSSSS        UU     UU

                  NN  NNNN    MM   MMM   MM                       SS     UU     UU

                  NN    NNN    MM      M      MM      SS            SS     UU     UU

                  NN      NN    MM               MM         SSSSSSSS     UUUUUU

                                  VM/ESA Rel. 2.0

                 If using TELNET to connect to our system, TAB to

                 the COMMAND line and type DIAL VTAM. Otherwise,

                 type VMEXIT on the COMMAND line to return to the

                           A - NOTIS, B - MUSIC screen.

 Fill in your USERID and PASSWORD and press ENTER

 (Your password will not appear when you type it)

 USERID   ===>

 PASSWORD ===>

 COMMAND  ===>

....................................................
This is a typical, IBM-mainframe opening screen. The instructions should probably have used the term tn3270 instead of TELNET. By entering the phrase DIAL VTAM, the user is presented with a menu choice:
          WELCOME TO COMPUTING AT N.M.S.U.

          Type the letter of the system you desire

          and Press ENTER

          A - Enter the NOTIS Library System

          B - Enter the MUSIC Academic System

.................
Selecting A brings up the online catalog menu:
                    LUIS:  LIBRARY USER INFORMATION SERVICE

        Pickler Memorial Library, Northeast Missouri State University

           To search for:          Type a command and press <ENTER>

                  Author             a=dickens charles

                   Title                t=gone with the wind

                 Subject            s=education elementary

      Children's subject        sc=family problems

                 Keyword           k=clancy and hunt and october

             Call number           cl=bx7432

        Type EXP OPT and press <ENTER> for a complete list of options.

        REMOTE USERS:  Type STOP and press <ENTER> to log off.

     For more information on searching in the Catalog, press <ENTER>.

 ------------------------------------------------  + Page 1 of 2  -------------

                    Enter search command                 <F8>  FORward page

                    NEWs

 NEXT COMMAND:

................................................
The user performs the search, enters STOP, and is presented with the menu choice again. Even though it is not stated, the command for logging off is UNDIAL. If the logoff command is not readily apparent, the user can hit Ctrl+C to receive the tn3270
prompt, at which time the word quit may be entered to break the connection. tn3270 connections are becoming less common, but there are still enough around to warrant this explanation.
Users who wish to make telnet connections from their IBM personal computer may do so with NCSA Telnet. This software was developed by the National Center for Supercomputing Applications at the University of Illinois at Urbana-Champaign. Unlike the UNIX
version, this client resides on a user's own personal computer, thus allowing direct access to other computers on the Internet running the TCP/IP protocols.
In order to run the software, the personal computer must have the following:
MS-DOS version 2.0 or later
An Ethernet adaptor board and cable
384KB memory (minimum)
An Internet address (usually supplied by a system administrator)
The software is available via anonymous FTP from
ftp.ncsa.uiuc.edu
After you log in to the site, change the directory to PC/Telnet/msdos. The files to receive are either tel2307b.zip or tel2307s.zip. The file tel2307b.zip is a PKZip 2.04 zipfile. It contains all the binaries and configuration files needed to run PC
telnet and is 717,475 bytes in size.
The file tel2307s.zip is also a PKZip 2.04 zipfile. It contains all the source code used to compile all the binaries, and the makefiles. It is 679,778 bytes large. There are no binaries in the source distribution.
It is essential that the config.tel file be edited, so that the machine's IP number can be listed. If editing this file is problematic, then a system administrator should be consulted. The administrator will also know if the machine has the correct
Ethernet adaptor attached. Because the software resides on a personal computer, it can take advantage of the capabilities of the machine. For example, colors can be chosen, the clock set, and capture files can have names chosen.
Let's now look at how the program is started, how the terminal type is set, and how a telnet session is closed.
The simplest way to start NCSA Telnet is from the DOS prompt:
c:\ telnet hostname
This command will, if the remote system is available, make an instantaneous connection. The user then logs in with a username and password if required.
Pressing Alt-H will bring up the help screen, overlaying the current session:
.............................

Alt-A   add a session                   Alt-Y     Interrupt Process

Alt-N   next session                    Alt-B     Previous Session

Alt-D   Dump Screen to Capture file     Alt-O     Abort Output

Alt-Z   message screen                  Alt-Q     Are you there?

Alt-E   escape to DOS shell             Alt-U     Erase line

Alt-G   graphics menu                   Alt-K     Erase Kharacter

Alt-C   toggle capture on/off           Alt-V     Paste Capture to Session

Alt-R   reset VT100 screen              HOME      exit graphics mode

Alt-H   this help screen                Ctrl-HOME clear/enter graphics mode

ScrLock pause/restart screen (DO NOT use Ctrl-NumLock)

ScrLock enter/exit scroll-back mode

Alt-F   start file transfer as if typed:ftp [internet address]

Alt-I   send my internet address to host as if typed

Alt-S   skip scrolling, jump ahead

Alt-P   change a parameter, one of: color, capture file name, backspace,

        session name, screen mode

Alt-X   close connection

CTRL-Shift-F3   abort program completely. STRONGLY discouraged

Press ESC for information page, space bar to return to session:
We will look at some of these commands later.
With NCSA Telnet, the simplest way to quit a single session is to log out of the remote machine, and be returned to the DOS prompt. However, it could be that there is no clear way of logging out. Just like the UNIX version of telnet, this program also
has an escape key: Alt-X.
So much for a single session. One of great strengths of NCSA Telnet is the ability to have more than one session live at any given time. There are two ways of performing this. First, a user can enter multiple machine names at the DOS prompt:
C:\ telnet machine1 machine2 machine3
and be prompted for login and password information on each machine. The second way is to use Alt-A to add another session.
The program uses VT100 terminal emulation. This means that only 24 of the screen's 25 lines are used by the terminal. The final line is used by the program to indicate the status of the sessions. Each session name is indicated in reverse video, with the
current session shown on the far left. The far right of the screen is reserved to show whether scrollback, capture, or FTP is enabled.
The program can connect only to computers that have IP addresses. A user can find legal names by checking the config.tel file. This file can be configured to use the local domain-based name server to check names and addresses of machines. Like the UNIX
version of telnet, this program enables a user to enter only the specific machine name (for example, willow, herald, or duke), providing they are all in the same domain—in this case, usask.ca. If the IP numbers are known, then it is neccessary only to
enter the last part of the number. So, if the local machine's number is 128.233.33.3 and the user wishes to connect to 128.233.33.7, then all that needs be entered is #7. Whereas UNIX allows a space between an IP address and a port number, this program
requires that a pound sign (#) be inserted (for example, 128.233.33.3#5000).
 Tip: Watch for the asterisk to disappear to show that you are connected.
It can sometimes take a couple of minutes to connect to a remote machine. While the connection is being made, an asterisk appears in the status box. This disappears when the connection is made. However, it may take further time for a login command to
appear. At this point, it may make sense to break the connection with Alt-X and begin the procedure again.
One of the most frustrating things about logging in to remote machines is that the information a user has received appears to drop off the top of the screen and be lost. NCSA Telnet has a very useful set of commands to enable a user to refer back to
that information. This is all achieved by the Scroll Lock key. When depressed, that key enables a user to refer back to received information with Page Up, Page Down, and the up and down arrow keys. The information can not only be read but manipulated with
cut-and-paste features. Here's how it works:
This procedure can also be accomplished with a mouse, but takes some dexterity:
To paste the captured text, the user hits Alt-B or Alt-N to switch sessions. Then:
NCSA Telnet also enables a user to capture text to a file on the personal computer or to a printer. An entire session or just a single screen can be captured. The Alt-C key combination turns capture on and off and appends the text to the file designated
in a user's parameters. To see the current name of the capture file and to change it if neccessary, Alt-P is depressed. This change can be made permanent by editing the config.tel file, which comes with the software.
Sometimes, a user may wish to capture only one screenful of information, particularly if that information is garbled by an Alt-C capture. To do this, use Alt-D. In any event, only one capture can occur at any given time. A user cannot capture text with
Alt-C in one session and Alt-D in another. If the captured text is to be sent to a printer instead of a file, the user should enter PRN as the capture file name.
In order to edit the captured file—and indeed, to perform other DOS commands—NCSA Telnet includes a DOS Shell feature. This is controlled by Alt-E. Typing exit returns the user to the program. While in the DOS shell, a user may run other
programs. However, any other program that wants to use the Ethernet connection will cause NCSA Telnet to crash. Other programs also may cause crashes. Learning which programs to avoid using is a matter of trial and error. Also, trying to run programs that
consume lots of random-access memory may cause problems.
The config.tel file determines how NCSA Telnet will run. It is a text file that can be easily edited with a DOS text editor. Some instructions may not be clear to novices, however, in which case a systems person should be consulted for advice. Some
parameters—for example, screen colors, capture-file name, terminal type, and so on—can be changed while in the program. Depressing Alt-P brings up the following:
   <      Select parameters, F1 to accept, F10 to leave unchanged      >

   --------------- Color setup and session parameters -----------------

 Text:         normal    reverse   underline

        Normal Foreground (nfcolor)       -       green

        Normal Background (nbcolor)     -       black

        Reverse Foreground (rfcolor)       -       black

        Reverse Background (rbcolor)     -       white

        Underline Foreground (ufcolor)    -       blue

        Underline Background (ubcolor)  -       black

        Use remote echo or local echo   -       Remote echo

        Backspace key sends               -       Delete

        Session name    *>      ahostname

        Terminal type   -       VT102 and Tek4014

        Line Wrapping   -       Wrapping On

        Output Mapping  -       Mapping Off

   -------------- Parameters which apply to all sessions --------------

        Capture file name       *>      capfile

  Screen mode (for BIOS compatibility)  Direct to screen

        File transfer is        -       Enabled

        Remote Copying is       -       Enabled

        Clock is        Enabled

Use arrow keys to select, Enter clears changeable field (*>)
To move through the list, the Up, Down, Home, and End keys are used. The left and right arrow keys allow changes to be made to fields by means of toggles. The fields marked *> can have new values added by hand.
NCSA Telnet comes with some other useful utilities that mirror their UNIX counterparts:
Finally, here is a summary of frequently-used program commands:
|
Alt-A |
Adds a new session. |
|
Alt-B |
Goes back to a another session. |
|
Alt-C |
Toggles capture file on and off. |
|
Alt-D |
Dumps the current screen into the capture file. |
|
Alt-E |
Spawns a DOS shell. |
|
Alt-F |
Starts file transfer as if typed: FTP Internet address. |
|
Alt-G |
Displays the Graphics menu. |
|
Alt-H |
Displays the Help screen. |
|
Alt-I |
Sends the internet address to the host. |
|
Alt-K |
Erases a character. |
|
Alt-N |
Goes to the next session. |
|
Alt-O |
Aborts output. |
|
Alt-P |
Changes a parameter (for example, color, capture file name, backspace). |
|
Alt-Q |
Sends the query, Are you there? |
|
Alt-R |
Resets the VT100 screen. |
|
Alt-S |
Skips scroll and jumps ahead. |
|
Alt-U |
Erases the line. |
|
Alt-V |
Copies text from clipboard onto the current session. |
|
Alt-W |
Sends your password when you're FTPing back to your PC. |
|
Alt-X |
Closes the connection. |
|
Alt-Y |
Interrupts the process. |
|
Alt-Z |
Displays the Message screen. |
|
Ctrl-Home |
Clears/enters graphics mode. |
|
Home |
Exits graphics mode. |
|
Scr Lock |
Enters/exits scrollback mode. |
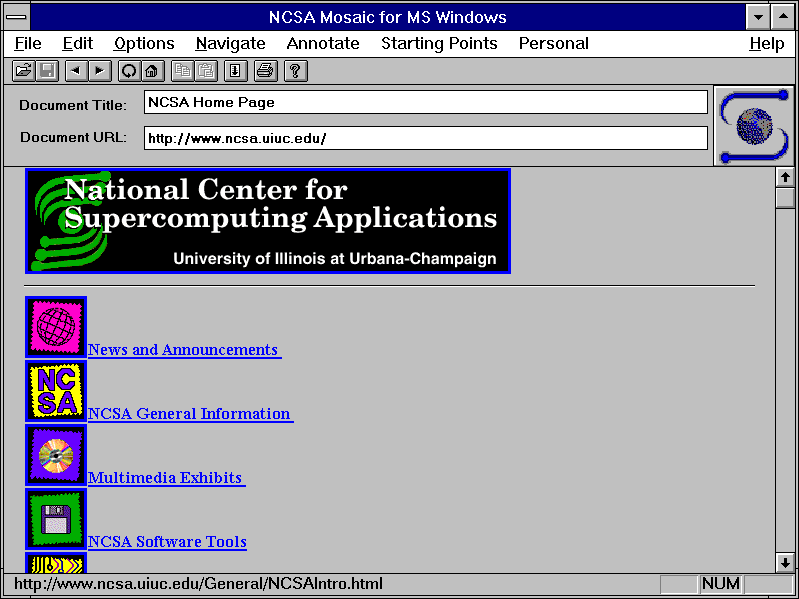
For more information on The National Center for Supercomputing Application, a user can connect to the NCSA Home Page (shown in Figure 8.1) on the World Wide Web:
http://www.ncsa.uiuc.edu
Figure 8.1. The NCSA home page.
A version that runs unders Windows 3.1 is called wintelb3.zip, available via anonymous FTP from ftp.ncsa.uiuc.edu in the /PC/Telnet/windows directory. It is currently in unsupported beta mode and will not be discussed here. Rather, I will look at
another Windows telnet program, WinQVT/Net.
Currently, the best Windows-based telnet program is WinQVT/Net, produced by QPC Software, P.O.Box 226, Penfield, NY, 14526 (e-mail djpk@troi.cc.rochester.edu for further details). The registered version costs $40, and the shareware version is available
via anonymous FTP from biochemistry.cwru.edu in the directory /gopher/pub/qvtnet as:
qvtws397.zip    Windows Sockets version

qvtne397.zip    packet-driver version

qvtnt397.zip    32-bit version for Windows NT
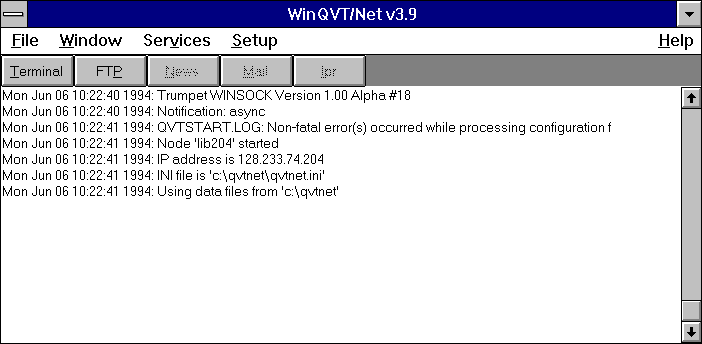
I presume that the user knows how to obtain the software and create an icon for it in Windows. To start the program, the user clicks the icon and is presented with a screen similar to Figure 8.2.
Figure 8.2. The WinQVT/Net startup screen.
Notice here that only the Terminal and FTP options have been configured.
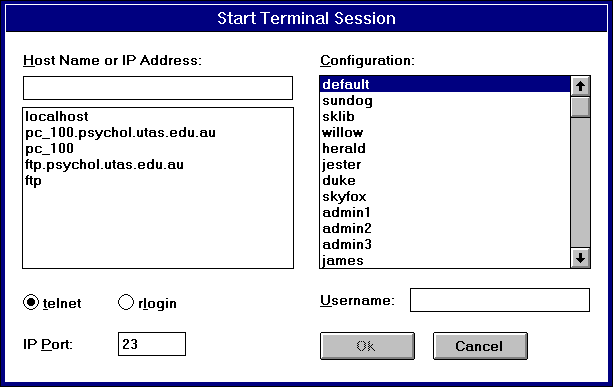
To start a terminal session, which can be either a telnet or rlogin connection, the user merely clicks the Terminal button to receive the Start Terminal Session window, as shown in Figure 8.3.
Figure 8.3. The Start Terminal Session window.
A description of the elements of this screen will be useful. The Host Name or IP Address: box can be used to enter the site to which a user may wish to connect. The telnet or rlogin button is selected, and the OK button is clicked.
Note: A username must be entered if making an rlogin connection.
Both telnet and rlogin connections function similarly to their UNIX counterparts; that is, telnet connects to port 23 of the remote machine, while rlogin connects to port 513. But while UNIX rlogin requires a user to key -L username, WinQVT/Net
accepts just the user's name. Also, if the connection requires another remote port number, then it can be added in the IP Port box.
Notice the large box on the right of Figure 8.3. This is the hosts list, which was created in the qvtnet.rc file. In this example, all machine names are local, meaning they belong to the usask.ca domain. However, any valid Internet address can be added
to the file. By selecting the entry for the remote machine herald and clicking OK, a connection is made, bringing up the login: prompt, as shown in Figure 8.4.
Figure 8.4. A connection is made.
Once the user is logged in, this screen can be turned into an icon in traditional Windows fashion, and another session can be started. In fact, up to fifteen concurrent sessions can be running at any given time.
Note: Use Alt-C to bring up the Console window. This brings up the Console window, from which other sessions can be started. It is, of course possible, to also start FTP, mail, news, and printer sessions from the Console window,
and have them all running simultaneously.
Note: Once a number of sessions are running, a user can key the Alt-N combination to switch between sessions. This can be faster than doing the same thing with a mouse. Other useful key combinations are Alt-Tab and Alt-Esc, which
place a window in the background.
WinQVT/Net's terminal sessions allow screen capture, logging a session to a file, the execution of scripts, cut and paste from one session to another, color and font selection, and the ability to redefine keys. Being a Windows-compatible program,
WinQVT/Net can also be used by such Worldwide Web browsers as Cello and Mosaic when spawning telnet sessions. It is a good idea to have it included in the Windows StartUp window, so that it loads automatically at login time.
There are other Windows-based telnet utilities worth looking at. These, like WinQVT/Net, are constantly being revised, so some of the filenames may change. They are all available via anonymous FTP from winftp.cica.indiana.edu:/pub/pc/win3/winsock:
Program Name |
Date |
Description |
|
ewan1c.zip |
940503 |
EWAN a free Winsock 1.1 telnet |
|
qws3270.zip |
940325 |
qws3270 Winsock tn3270 emulator (3/25/94 release) |
|
trmptel.zip |
940311 |
Trumpet TELNET (VT100) Terminal for Winsock |
|
vt220.exe |
940519 |
Dart Communications VT220 for workgroups Winsock |
|
wintelb3.zip |
931202 |
NCSA Telnet for MS Windows (unsupported beta 3) |
Tip: Get a copy of Hytelnet for the most complete index of telnet-accessible resources.
The very best source of telnet-accessible sites can be found in the Hytelnet utility. Here is the announcement for Version 6.7, which was released May 16, 1994:
Hytelnet version 6.7, the utility that gives an IBM-PC user instant-access to all Internet-accessible library catalogs, FREE-NETS, CWISs, BBSs, Gophers, WAIS, etc. is now available. You can get it via anonymous FTP from: ftp.usask.ca in the
pub/hytelnet/pc/latest subdirectory. It is listed as hyteln67.zip:
URL= ftp://ftp.usask.ca/pub/hytelnet/pc/latest/hyteln67.zip
Version 6.7 is a major upgrade. Much redundant information has been deleted, and errors have been corrected. All the new/updated files created since Version 6.6 have also been incorporated. The unzipped files total over 1.2 MB. . .but remember, you can
always edit out any information you do not need, in order to save space.
Information from Roy Tennant follows, slightly edited, describing how to obtain Hytelnet 6.7 from the FTP site:
Proceed with the following instructions to retrieve the UNZIP utilities (which you need unless you already have them).
The Hytelnet program is archived using a PKZIP.EXE. To unarchive it, you must be able to unzip the file. If you have the file PKUNZIP.EXE, it will unarchive the hyteln67.zip file. If you do not have it, you may retrieve it by following these
instructions:
You can also unarchive with UNZIP.EXE. To retrieve it, follow these instructions:
Because of the plethora of PC communications programs, I will not attempt to give step-by-step instructions on how to download to your PC. You should check the instructions for your software for downloading a binary file from your Internet account to
your PC.
To Unarchive hyteln67.zip, make a new directory on your hard disk (for example, mkdir hytelnet) Copy PKUNZIP.EXE or UNZIP.EXE and hyteln67.zip into the new directory. Make sure you are in that directory, then enter pkunzip hyteln67.zip. This will
unarchive hyteln67.zip, which contains the following files:
HYTELNET.ZIP

READNOW
The file READNOW gives full instructions for unarchiving HYTELNET.ZIP. Simply put, you MUST unZIP the file with the -d parameter (if you are using PKUNZIP.EXE) so that all the subdirectories will be recursed. If you are using UNZIP.EXE, no
parameters are required.
To use Hytelnet, you should refer to the instructions in the release announcement or to the README file included with the package.
Please note that I offer these instructions as a service for those who are unfamiliar with the steps required to download and use files from network sources. I cannot be responsible for any local variations in these procedures that may exist. Please
contact your local computer support staff if you have difficulty performing these tasks.
The UNIX/VMS version, created by Earl Fogel, is available for browsing by telnet to access.usask.ca; login with hytelnet (all lowercase). For more information on this version, contact Earl at fogel@herald.usask.ca.
![]()
![]()
![]()
![]()
![]()