Atari 5200 Joystick connector pinout |
layout |
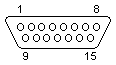 15 pin D-SUB MALE connector at the Atari |
It"s handy to consider the keypad in a matrix format.
For instance, mashing button 5 makes a connection between pins 2 and 6. Analog Direction Inputs Potentiometer inputs are 0-500kohm, linear. Directional inputs are read by a RC delay circuit, i.e. the time it takes a capacitor to recharge after being discharged determines the potentiometer positions.
The analog joystick is very much like having a pair of paddles, one each for horizontal and vertical coordinates. The difference is that while paddles use the 5V source for the common voltage, the 5200 analog stick has its own dedicated pin. This is because the stick has a definite center, while the paddles do not. To get consistent behavior with any combination of individual stick and individual console, they could have put trimmers on the stick so the user can adjust the center position. Instead of making each stick adjustable to suit the console, they gave the pots a tightly regulated voltage that"s adjustable within the console. That"s what the tiny little trimmer hanging out near the power on/off switch does. Not that big one; that"s for adjusting the color phase delay. Side buttons are held high by the console until pulled down to ground by mashing a button. The keypad is read one column at a time. One of pins 1-4 is pulled low, then any buttons in that column that are mashed are read as low signals on pins 5-8.
| |||||||||||||||||||||||||||||||||||||||||||||||||||||||||||
Pinouts.ru > Pinouts of input devices (keyboards, mices, joysticks) > Pinout of Atari 5200 Joystick connector and layout of 15 pin D-SUB MALE connector Source(s): Classic Atari 2600/5200/7800 Game Systems FAQ, from Hardware Book, Eric Parent; Deathskull Labs | unknown | |
|
mark as correct |
0 report(s) | |
| Click one of this links to change document status. | ||